What's new in The Falklands War: 1982
What's new in The Star and the Crescent
How to 'Flip' a Scenario
![]() Download Flip a Scenario instructions in Adobe™ Acrobat™ format
Download Flip a Scenario instructions in Adobe™ Acrobat™ format
Unlike some other wargames, the AI is so complex in Armored Task Force that all scenarios cannot, by default, be played as either side. However, it is a very simple matter, using the ATF Scenario Builder for anyone to 'flip' a scenario; that is, make the player forces into 'enemy' forces and the enemy forces into player forces, in order to play as the 'other side' in a scenario..
The remainder of this topic discusses the particulars of 'flipping' a scenario, but, in general, the steps are as follows:
- Make a copy of the original scenario and save it.
- Flip the friendly and enemy forces.
- Flip the friendly and enemy obstacles.
- Flip the friendly and enemy holes.
- Flip the components, battle plans, and AI scripts.
Make a copy of the original scenario:
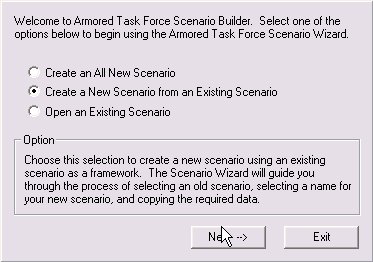
We want to begin by making a copy of the original scenario to edit, so that we do not alter the original scenario. To do this, we will use the ATF Scenario Builder Wizard. This topic assumes only that you have started the ATF Scenario Builder.
|
1. Select 'Create a New Scenario from an Existing Scenario' and 'Next'. |
|
|
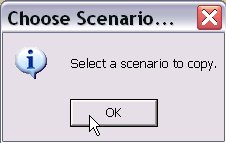
2. Click 'OK' |
 |
| 3. Select the name of the original scenario that you want to copy. | 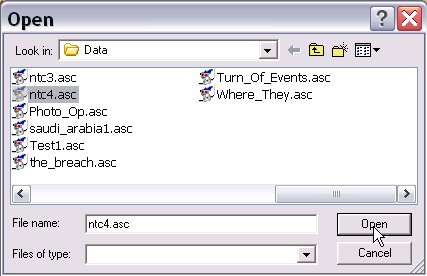 |
| 4. You are going to specify a 'file title' for this scenario. This is the base file name from which all of the filenames in this scenario will be constructed. Select 'OK'. | 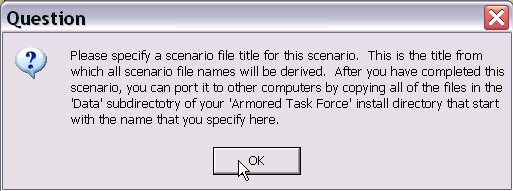 |
| 5. Select a name and click 'OK'. | 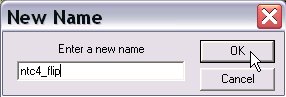 |
| 6. Now you can specify a new scenario name. This is the name that will appear when the scenario is being selected and in the main window when the scenario is loaded. | 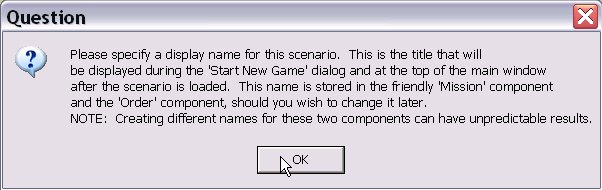 |
| 7. Specify a name and select 'OK' | 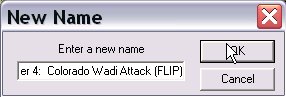 |
| 8. You have now completed copying the scenario. Select 'OK' | 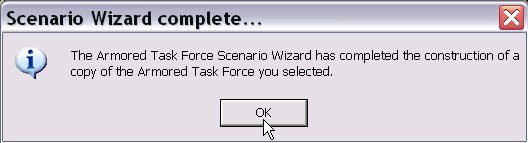 |
| 9. You must save the scenario before continuing. You will need to manipulate files of this scenario, so they must be saved first. Select 'Save' from the 'File' menu or the toolbar. |  |
| 10. The Scenario Builder will suggest the file title as the name for this scenario. Select 'Save'. | 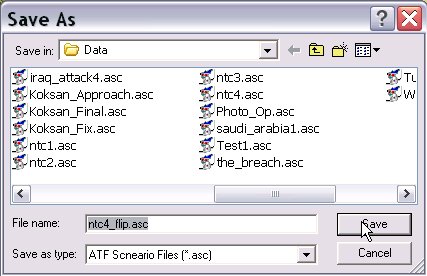 |
Flip Unit Arrays and Hierarchy Arrays:
Now that you have copied the original scenario, you must 'swap' enemy and friendly units and hierarchies. Units are stored in a 'Unit Array', saved with a file name ending in the extension '.unt'. Hierarchies (companies and platoons) are stored in a 'Hierarchy Array' with a file extension of '.hra'.
The basic steps in 'flipping' units and hierarchies are:
- Remove all of the units from the enemy and friendly faction
- Load the enemy units as friendly units.
- Load the friendly units as enemy units.
- Load the enemy hierarchies as friendly hierarchies.
- Load the friendly hierarchies as enemy hierarchies.
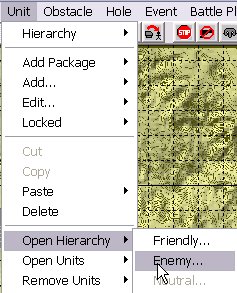
| 1. Select 'Friendly' from the 'Remove Units' sub-menu of the 'Unit' menu. | 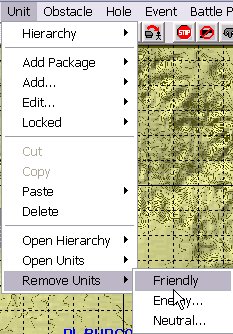 |
| 2. Select 'Yes' to confirm this action. | 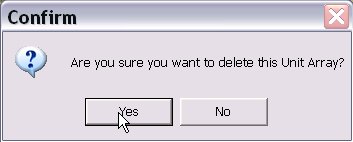 |
| 3. Select 'Enemy' from the 'Remove Units' sub-menu of the 'Unit' menu. | 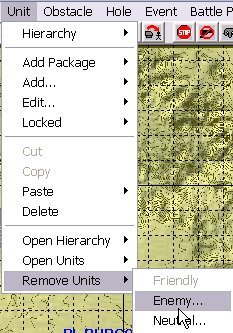 |
| 4. Select 'Yes' to confirm this action. |  |
| 5. Select 'Friendly' from the 'Open Units' sub-menu of the 'Unit' menu. | 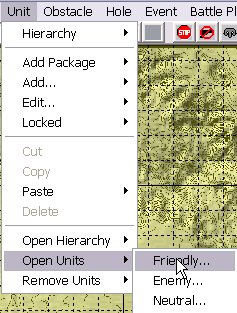 |
| 6. Select the enemy 'Unit Array' file (extension .unt). Note that if the original scenario has a battle plan, there will be more than one enemy Unit Array. In this case (as in the example here), select the one that does not end in a number. This is the 'base' enemy Unit Array, that is loaded when you load the scenario in the Scenario Builder. | 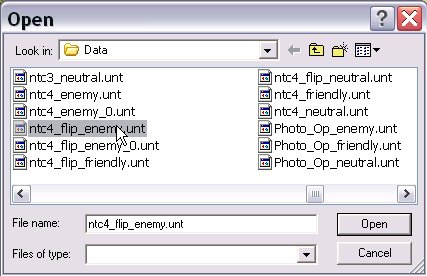 |
| 7. Select 'Enemy' from the 'Open Units' sub-menu of the 'Unit' menu. | 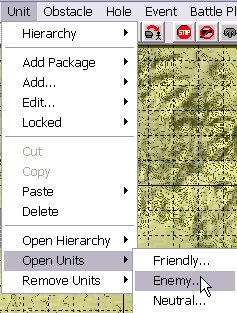 |
| 8. Select the friendly 'Unit Array' file (extension .unt). | 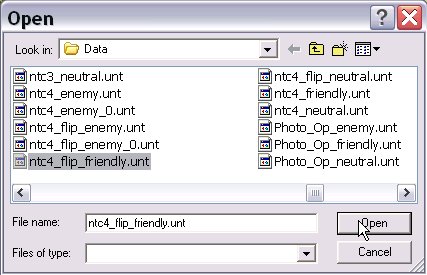 |
| 9. Select 'Friendly' from the 'Open Hierarchy' sub-menu of the 'Unit' menu. |  |
| 10. Select the enemy 'Hierarchy Array' file (extension .hra). Note that if the original scenario has a battle plan, there will be more than one enemy Hierarchy Array. In this case (as in the example here), select the one that does not end in a number. This is the 'base' enemy Hierarchy Array, that is loaded when you load the scenario in the Scenario Builder. | 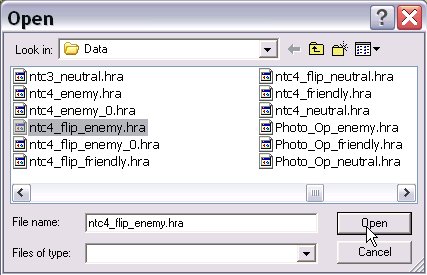 |
| 11. Select 'Yes' to confirm this action. | 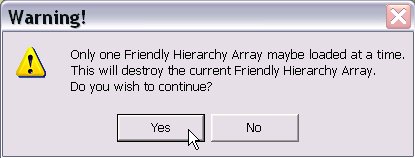 |
| 12. Select 'Enemy' from the 'Open
Hierarchy' sub-menu of the 'Unit' menu.
|
 |
| 13. Select the friendly 'Hierarchy Array' file (extension .hra). |  |
| 14. Select 'Yes' to confirm this action. |  |
Flip the Obstacle Arrays:
Obstacles (mines, wire, tank ditches, and road craters) are stored in 'Obstacle Arrays'. There are two types of Obstacle Arrays. Friendly Obstacle Arrays, with an extension of '.fob', are used by the friendly faction in scenarios. Enemy obstacle Arrays, with an extension of '.eob', are used by neutral (allied) and enemy factions in a scenario. These file types are not interchangeable.
Luckily, however, the ATF Scenario Builder includes a utility to 'convert' enemy Obstacle Arrays to friendly Obstacle Arrays, and vice versa.
The rest of this section provides detailed instructions for 'flipping' Obstacle Arrays. But, in general, the steps are as follows.
- Convert the enemy Obstacle Array to a new friendly Obstacle Array.
- Load the converted obstacles as the friendly Obstacle Array.
- Convert the friendly Obstacle Array to a new enemy Obstacle Array.
- Load the converted obstacles as the enemy Obstacle Array.
| 1. Select 'Enemy to Friendly' from the 'Convert' sub-menu of the 'Obstacle Menu'. | 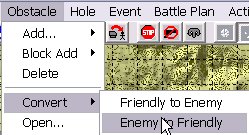 |
| 2. Select the enemy 'Obstacle Array' file (extension .eob). Note that if the original scenario has a battle plan, there may be more than one enemy Obstacle Array. In this case (as in the example here), select the one that does not end in a number. This is the 'base' enemy Obstacle Array, that is loaded when you load the scenario in the Scenario Builder. | 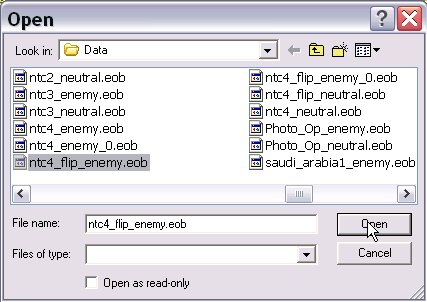 |
| 3. Specify a file name for the converted enemy Obstacle Array. Do not overwrite the friendly Obstacle Array. Select a new file name instead. | 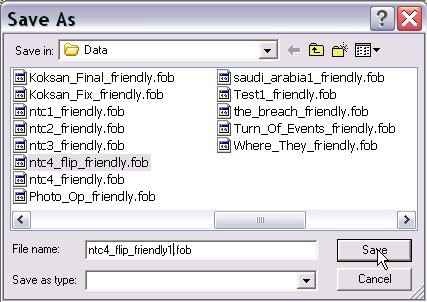 |
| 4. Select 'Open' from the 'Obstacle' Menu. |  |
| 5. Select the new, converted Obstacle Array (file extension .fob) that you just created. | 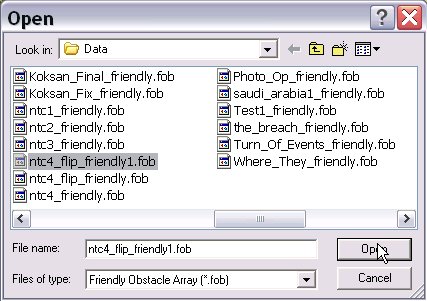 |
| 6. Select 'Yes' to confirm this action. | 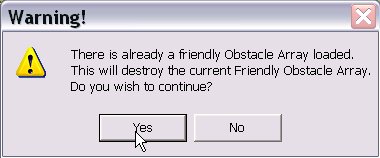 |
| 7. Select 'Friendly to Enemy' from the 'Convert' sub-menu of the 'Obstacle' menu. |  |
| 8. Select the friendly Obstacle Array (extension .fob). | 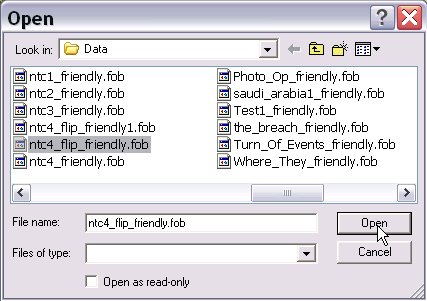 |
| 9. Select a new name for the converted Obstacle Array. Do not overwrite the current enemy obstacle array. | 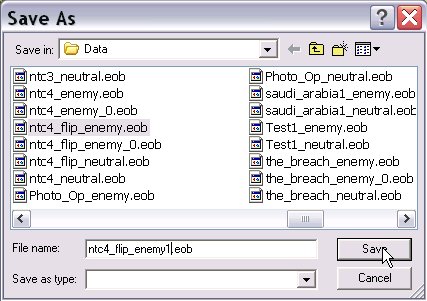 |
| 10. Select 'Open' from the 'Obstacle' menu. | 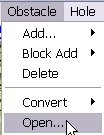 |
| 11. In 'Files of Type', select 'Enemy or Neutral Obstacle Array (*.eob)' to list all of the enemy Obstacle Arrays (extension .eob) in the 'Data' sub-directory of your ATF install directory. | 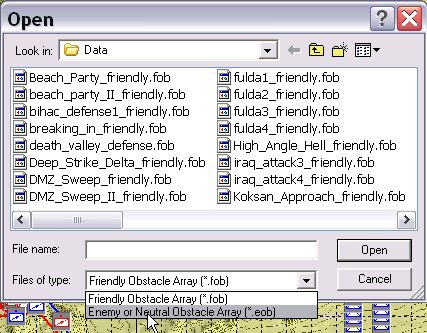 |
| 12. Select the new, converted Obstacle Array (file extension .eob) that you just created. |  |
| 13. Select 'Yes' to indicate that you want to load this as the enemy Obstacle Array (as opposed to the neutral or allied obstacle array). | 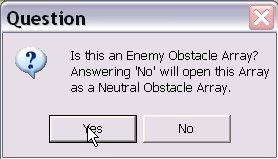 |
| 14. Select 'Yes' to confirm this action. | 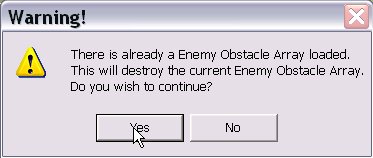 |
Flip the Hole Arrays:
Vehicle and dismount holes are stored in 'Hole Arrays'. Each faction has its own Hole Array, but they are completely interchangeable (i.e. there are not separate enemy and friendly formats, as with Obstacle Arrays).
The rest of this section provides detailed instructions for 'flipping' Hole Arrays. But, in general, the steps are as follows.
- Load the enemy holes as the friendly Hole Array.
- Load the friendly holes as the enemy Hole Array.
| 1. Select 'Open' from the 'Hole' menu. | 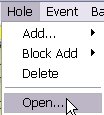 |
| 2. Select the enemy Hole Array. | 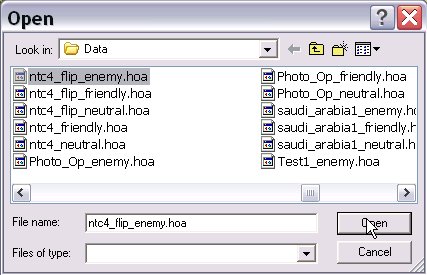 |
| 3. Select 'Friendly' and 'OK' | 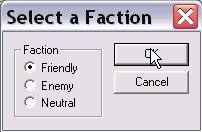 |
| 4. Select 'Open' from the 'Hole' menu. | 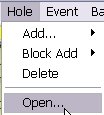 |
| 5. Select the friendly Hole Array. |  |
| 6. Select 'Enemy' and 'OK'. | 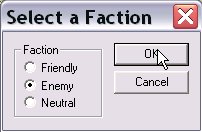 |
| 7. Select 'Yes' to confirm this action. |  |
Other changes:
As we mentioned at the outset, the AI in Armored Task Force is more complex than in many other wargames. As a result, simply swapping files is not sufficient to 'flip' most scenarios.
In addition to the steps above, the following, additional changes must be made to flip a scenario.
- Delete and/or create battle plans.
- Change Missions and Victory Conditions.
- Flipping Maneuver Graphics and Enemy SITTEMPS
- Creating new 'Enemy' Faction AI Scripts
| 1. Select 'Enemy' from the 'Delete' sub-menu of the 'Battle Plan' menu. | 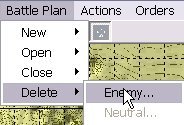 |
| 2. Highlight a battle plan and 'OK'. | 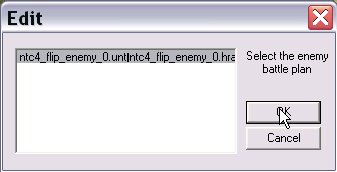 |
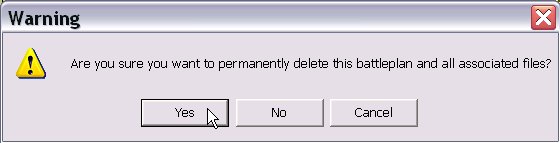
| 3. Select 'Yes' to delete the battle
plan.
Repeat steps 1-3 until all battle plans have been removed. You can now add new enemy battle plans for the 'flipped' scenario. For more, click here. |
 |
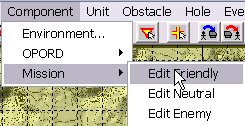
| 4. Select 'Edit Friendly' from the
'Mission' sub-menu of the 'Component' menu.
You will need to change the 'Global Direction', win and loss text, and victory conditions to reflect the objectives for the 'new' friendly (player controlled) force. To see more, click here. Make sure you also change the 'Global Direction' in the neutral and enemy Mission components. |
 |
| 5. To continue, you will need to save the scenario. Select 'Save' from the 'File' menu or toolbar. |  |
| 6. Close the ATF Scenario Builder by selecting 'Exit' from the 'File' menu or the 'Close' button at the top-right of the main window. | 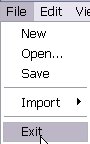 |
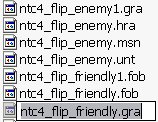
| 7. Using Windows Explorer, change the name
of the Maneuver Graphics (the friendly .gra file) to the name of the
Enemy SITTEMP (the enemy .gra file). Then do the reverse,
changing the Enemy SITTEMP file name to that of the Maneuver Graphics.
When you are done, restart the ATF Scenario Builder. You will find that the Enemy SITTEMP is now displayed in blue, as the Maneuver Graphics, and the Maneuver Graphics are now displayed in Red, as the Enemy SITTEMP. Additional editing to the graphics may be required. For information on how to do this, click here. |
 |
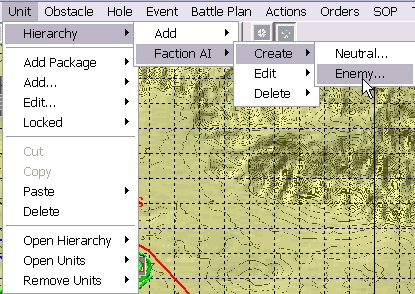
| 8. Finally, you might need to create Faction
AI for the 'new' enemy (opposing) units and hierarchies. Select
'Enemy...' from the 'Create' sub-menu of the 'Faction AI' sub-menu of
the 'Hierarchy' sub-menu of the 'Unit' menu (phew!).
For more information on creating a Faction AI script, click here. |
 |